Monday 30 December 2013

Firework Nails


Hi everyone!

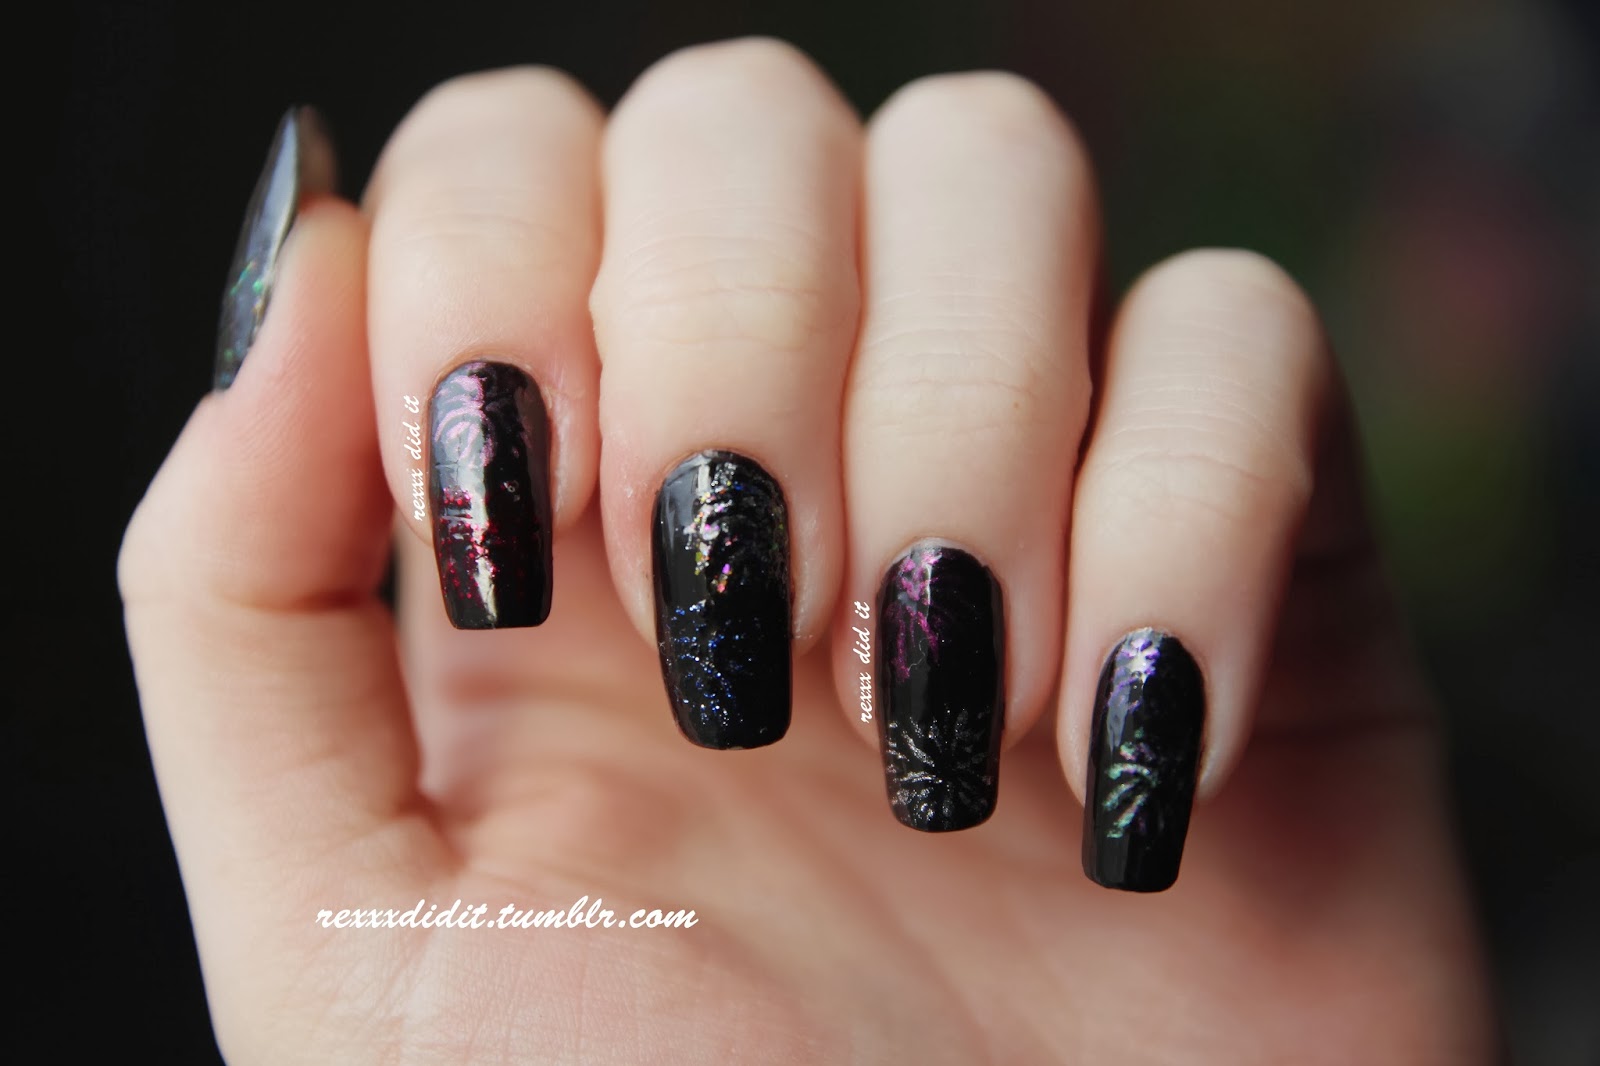
Today I have a firework design on my nails, very appropriate around New Year's Eve :)
(unfortunately, also not very original, but since it's my first time doing firework nails I'm considering them original for me anyways :p )

I used a lot of polishes for this design:

OPI - Nail Envy (my favourite base coat)
Sinful Colors - Black on Black
OPI - DS Lapis (Raw Granite)
Essie - Toggle to the Top
The Dazzling Starry Magical Multicolored Shell Glitter Nail Art Polish Varnish #4 from Bornpretty Store
Hema - 07 (pink)
Hema - 08 (purple)
Hema - 17 (light purple greyish)
Hema - 15 (light pinkish)
Hema - 11 (silver)
Essie - Let it Shine topcoat

The Hema polishes were a Christmas gift, so I really wanted to use them in a design to see what they looked like. I'm very happy I got them, they're so pretty!


These polishes have colours that I wouldn't buy myself (I like or very plain colours without any shimmer of glitter in them, or very obvious glittery special polishes, and these Hema polishes are the inbetween ones, they are all one colour polishes but have very subtle shimmer in them, if you know what I mean?), so it's great that I got them as a gift because this way I'm discovering some great new colours that, to my own surprise, I really like.


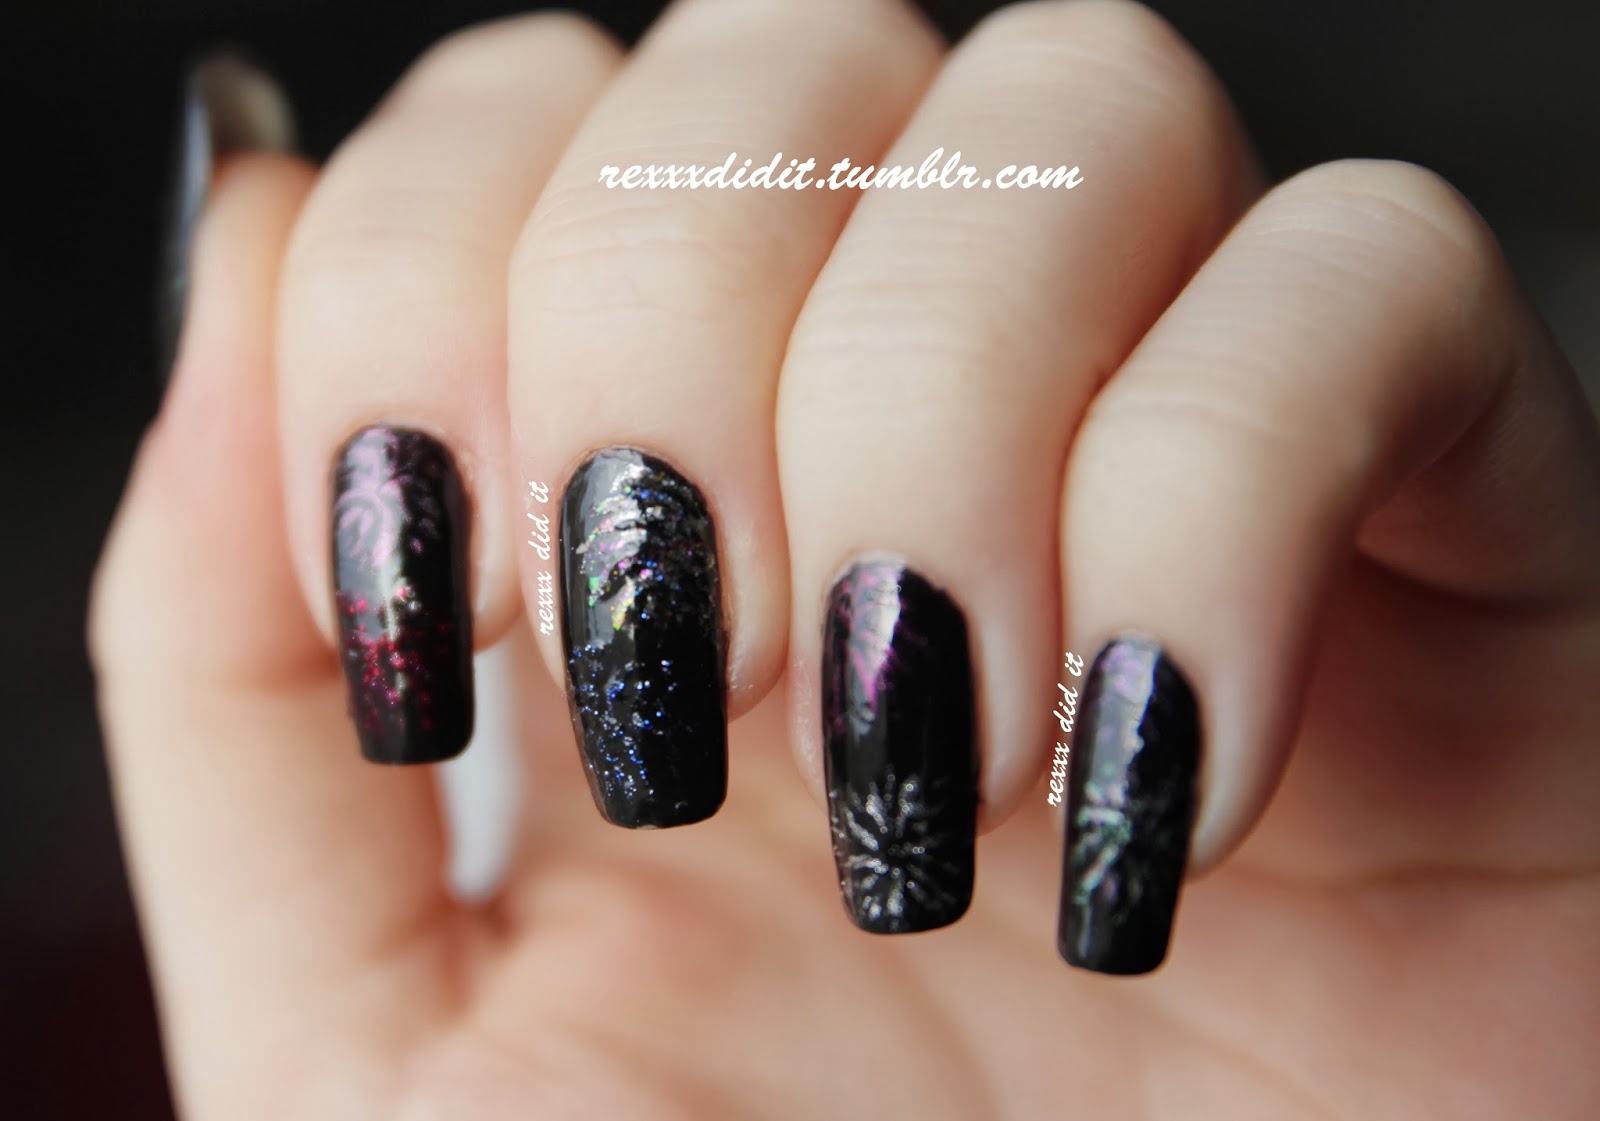
For these firework nails, I first painted my nails black with two coats of Black on Black.
Then I used a small nail art brush to make the fireworks. I just drew a lot of lines on my nails, I don't really have a technique to make these.


Do you have a special New Year's Eve manicure in mind? I'm planning on making a very glittery design tonight to start 2014 in a very (very) bright way!

Hope you all have a great end of 2013 and an even greater start of 2014!

Friday 27 December 2013

Christmas Nails #2


Hi everyone!

These are the nails I wore for Christmas! I used gold and green colours, because they are incredibly Christmas appropriate :)

First I painted all my nails gold, and then I used a tiny brush to paint on the twirly things that are supposed to represent Christmas trees - can you see how they're supposed to look like a tree?

I wanted to do a gold accent nail, so I spent about half an hour placing gold glitter on my ring finger - which was so worth it! I had never done anything with glitter like this before, but honestly, I was so glad I had done this because it felt very rewarding when I was finished and saw the glittery goodness that was now on my nail :)


I'm sorry for the lack of posts lately - right now is a very busy time with lots of papers to write! But I already have a great New Year's nail art idea, so I'm definitely doing that soon!

I hope everyone had a great Christmas or just a great day (I know I did - so much food!).
Thanks for reading!

Monday 23 December 2013

Abstract Christmas Trees


Hi everyone!

I finally got into the Christmas spirit and did some Christmas nail art :)

I chose to do abstract(ish) Christmas trees. 

I first painted my nails with a base coat and then with white, and then I drew little green triangles with a small brush. I then put two coats of the gorgeous Stop for an Ice Cream by Essence on top. This colour is a very sheer light green with lots of sparkles in it. Unfortunately it's not very visible in my pictures, but if you look closely you can still see it (right?). It also makes my white polish a bit more yellow.

Then I added some yellow rhinestones at the top of the trees on all my nails, and added some pink and greyish ones on the tree on my ring finger.


The colours I used are:
FM1 - D'Orleac
A Walk in the Park - Essence
Stop for an Ice Cream - Essence

I'm going to do some more Christmas themed nail art tonight, I'm looking forward to it!

Hope you have a great Christmas and thanks for reading!

Tuesday 17 December 2013

Floral Print Nails (to match my dress)


Hi everyone!

I'm really happy about this floral design I did :)
I got a fancy black dress with yellow flowers at the top, and I wanted to match my nails to it :)


At first I wanted to do two accent nails with flowers on each hand, but I had spent a lot of time on the first two nail of each hand that I just didn't have the courage anymore to do it. But now I got the trick to making these flowers, so next time it will definitely go a lot quicker!


As you can see, I kept the rest of my nails very sober with black polish which I mattified. The bottom part of my dress is also black, so that matched as well. I made the flowers by creating swirl shapes (or half circle shapes) with yellow and brown polish.


I'm really happy with how this turned out :) I now know how to make these flowers, so next time I'll be able to do it quicker (hopefully)

Thanks for reading!

Wednesday 11 December 2013

Colourful Leopard Print


Hello everyone!

Yes, I have another leopard print design for you today - sometimes I just get sort of addicted to a pattern and I want to make it in all different colours and variations, so that's what's happening here :)

I did a colourful leopard print for this one, but did something extra as well: on my ringfinger I used rhinestones to create the leopard effect. I used blue, green, pink and yellow rhinestones and then made lines around them with black nail polish. Shiny!

For those of you interested in the colours and how I made the design:

The colours I used are:
FM1 - D'Orleac
Miss Minty - Gosh
Lapiz of Luxury - Essie
Rose Libertine - Rimmel
Mate 01 - D'Orleac
85 - Bourjois Paris
Black on Black - Sinful Colors
Let it Shine topcoat - Essie


For this design I first painted all of my nails with two colours of white. I let it dry, and then I made the colourful parts of the leopard print.

I put some nail polish of one colour on my dotting tool, and made little spots with it on my nails. Make sure that the spots are a bit random, and not perfect circles. I did this for every colour, and made sure that I had a spot of every colour on each of my nails.

I waited until it was dry and then I used a small pencil to outline the spots with black polish. But don't outline the spots completely. And then I placed some random black stripes between the spots.

However, I didn't do this for my ring finger. For this nail, I chose some rhinestones with colours close to the colours of the polishes I had used.

I painted my nail white first, and waited until it was dry. Then I painted a top coat on, to make sure the rhinestones would stick. I placed the rhinestones on my nail in a 'leopard print' sort of way: not perfect circles, a bit randomish.

Then I covered it with an unbelievably massive amount of clear topcoat, and outlined the rhinestones with a small brush and put some small black stripes in between the spots.


And that's it! I really love leopard print a lot, I find it very easy to make and it just always looks good :)

Wednesday 4 December 2013

The Group Critique - Beginning Blogger's Bootcamp

Hi everyone!

I just wanted to let you all know I'm taking part in The Group Critique of Will Paint Nails For Food's Beginning Blogger's Bootcamp (wow, that's probably a really confusing sentence but I don't really know how to simplify it).

Meghan of Will Pains Nails For Food is making a series of posts called Beginning Blogger's Bootcamp, where she gives a lot of tips about how to blog and what you should pay attention to.
Right now there's a group feedback session, so everyone can give constructive criticism on your blog 
(Here's Meghan's blogpost about it).

It's really helpful to know what things are good about your blog, and what things you could change. I myself have certain preferences in lay-out, style of writing and so on, but maybe other people are really bothered by some things so it's very handy to know that :)

If you have some feedback about my blog, don't hesitate to leave a (constructive) comment! I've already gotten some feedback and they said some things I've never had given much thought to, so it's great to get some new perspectives this way.

Here's some things you can give feedback on:
  • Navigation: Is it easy to find things? Can you find out where to follow, leave a comment, learn more about the blogger, find past posts?
  • Photos: Are they clear and in focus? Do you have any suggestions for how to improve them?
  • Writing: Is the blogger's writing easy to follow? Do they write their posts in one long paragraph or do they break it into easy to read chunks of text?
  • Layout/Design: Does the design go well with the content? How is the layout, are the components of the blog organized in a logical manner?

It's of course very handy if you have a comment about improving my blog, but it's also helpful to know if you think something about my blog of blogposts is very good which I shouldn't change, so you can definitely also leave a comment about that :)

Thanks to everyone who wants to give feedback, and I'll definitely check your blog out too if you're participating in the feedback session as well!

Saturday 30 November 2013

Bright Pink Leopard Print With Gradient


Hi everyone!

I'm so in love with today's manicure! I did a light blue-green gradient with bright pink leopard print on top, as you can see.

The colours I used for the gradient are:
Lapiz of Luxury (Essie)
Miss Minty (Gosh)

For the leopard print I used:
Amazing California Love (OPI)
Black on Black (Sinful Colors)


I first created the gradient by using a piece of sponge. I waited until the polish had dried and then I did the leopard print on top. 
The green colour I used looks more baby blue in these pictures, as it does on my nails - the combination with the real blue colour just makes the green one look different, but I quite like this actually. I think these colours fit really nicely together :)


 I'm really liking this design, it's so bright and cheerful :)


Friday 29 November 2013

Distressed Nail Art (Chalkboard Nails' technique)


Hi everyone!

I loved Chalkboard Nails' distressed punky nail art so much that I just had to try it for myself, and I am sooo liking the result on my nails!
I followed her super easy tutorial to make this design, it's really amazingly simple and it looks so cool!

The colours I used here are:
FM1 - D'Orleac (white)
MATE 01 - D'Orleac (orange)
Black on Black - Sinful Colors
Miss Minty - Gosh
Lapiz of Luxury - Essie
Amazing California Love - OPI

I think these colours look really great together in this design! I didn't always use all of the colours: on my thumb, middle finger and pinky I used the pink, blue and mint green; on my index finger and ring finger I used pink, blue and orange.


What do you think? Has any of you done this design yet? I'm really loving it, this is definitely a design I'll be doing a lot!

Thanks for reading!

Tuesday 19 November 2013

Duochrome


I told you a few days ago that I had bought my first duochrome polish - it's Spectral Green by Nocibé.
I was really curious to try it out. I had never used a duochrome polish before, so I actually can't really say anything constructive about this one because I can't compare it with any other duochrome polish.

That being said, I do love this one!
The colour shifts from bright green via mermaidish ocean blue to dark blue - my favourite colour of all these is the mermaid one :) (you can see it on the picture below, with a bit of the green colour as well - I sort of managed to capture the colour shift in pictures)


When you look straight at the polish on my nails, it just seems green. But if you tilt my hand a bit (or move your head, whatever works for you) the colour changes. I think I spent at least ten minutes in the bathroom looking at how pretty the colour shifted while brushing my teeth, haha.

It's really hard to get decent pictures of these polishes where the colour shift is visible. I have hundreds (and yes, I really do mean hundreds, it's not an exageration) of failed pictures of this on my computer. It's very frustrating when the colour shift is so obvious when you just look at your nails, but it's just not visible in pictures... However, I think I sort of managed to capture the colour shift in the pictures I'm showing you here (right?)


Do you have any duochrome polishes? Do you love them as much as I do? :)


*EDIT: I've made a gif to show the colour shifts even better!*


 Thanks for reading!

Friday 15 November 2013

Dry Marble with Essie's Lapiz of Luxury


I went on a little shopping trip a few days ago and bought three new nail polishes (hurrah!)
I got Essie's Lapiz of Luxury, which is a soft blue polish, Essie's topcoat Let it Shine, and Spectral Green by Nocibé, which is a sort of duochrome green polish. I'm excited to try that one out!

But first I tried out the Essie polishes. I thought the soft blue would make a perfect match with my mintgreen shade Miss Minty from Gosh, so I wanted to do a design with these two.

I actually wanted to do a watermarble design because I need some practice in that and I thought it would look great with these two colours, but Essie's Lapiz of Luxury is NOT a watermarble-proof polish AT ALL. When I put a drop of it in the water, it completely spread out, but not in the way it's supposed to: it just sort of dissolved in the water, it was very strange. 
I thought maybe I did something wrong or the water was not the right temperature, so I tried it again, but I got the same result. I hadn't tried watermarbling with Essie polishes before, so I don't know if it's something that is the same for all of them, but I knew that I couldn't watermarble with this one...

So I opted for a dry marble instead, because I really did want to do a design where the two colours sort of mixed, I didn't want to have hard, clear lines which seperated the two colours, I wanted flowy lines because these colours are very soft and I think flowy lines look great with soft colours :)


So as you can see, I did a dry marble on my middle finger and ring finger, and I painted the rest of my nails with Miss Minty. I then added a few rhinestone because I thought the colour of the rhinestones fitted so perfectly with the colours of the polishes :) 

I then added Essie's Let it Shine and well, look at the shine! I'm really happy with this topcoat, because it didn't smudge the design and it's so much shinier that my previous topcoat! Of course I still need to put it to an ultimate test (a black and white design), but for now I'm very pleased with it.


So, what do you think of this design? Has any of you ever tried to watermarble with Essie polishes and if so, what was the result? I'm quite curious to know if it's impossible to watermarble with the other Essie polishes as well :)

Thanks for reading!

Tuesday 12 November 2013

The Versatile Blogger Award

Hi everyone!


A few days ago Lucy from The Nail Snail nominated me for The Versatile Blogger Award!
I had read some things about this award before, but I still had to look up information on what it exactly entails. It's basically an award that you give to blogs you follow and like, and you post their link so other people can discover some new blogs through this. I've already discovered some great new nail art blogs in Lucy's list!


Maybe you all have had it with awards like this, but I'm still in the "yeey everything about blogging is new and exciting and OOOH I got a new comment on my post!" phase, so I was really happy with this award. I'm glad people read my posts and like my designs :)

The rules of the Versatile Blogger Award go as follows:
  1. Thank the person who nominated you - THANK YOU Lucy! :)
  2. Include a link to their blog.
  3. Select 15 new blogs/bloggers that you've recently discovered or follow regularly.
  4. Nominate those bloggers for a Versatile Blogger Award, leave a link to their page and let them know they've been nominated.
  5. Tell the person who nominated you 7 things about yourself.
Alright, on to the nominating! I chose soms blogs that I absolutely love, most are nail art related.

These are all about nail art, and they have amazing designs:

With the following blogs, I want to give some more explanation as to why I like them so much:

Well okay, this one probably doesn't need a lot of explanation, and you probably all know her already - she has amazing nail art!

I just discovered this blogger a few days ago, and she has such amazing designs! She doesn't just paint her nails, but also completes the look with snakeskin or fake blood on her hands for Halloween :)

My absolute idol in regards to watermarble!

This is not a nail art blog, but more a blog about fashion and very cute outfits. I think this is a great blog to get some inspiration for nail art.

Amazing nail art, I'm a big fan! Her blog is in Danish (says Google - I can't understand a word of it) and of course Google translate isn't that accurate, but she paints the most unbelievable things onto her nails.

15. Paulina's Passions
The most beautiful designs, I often cannot believe my eyes when I see her nail art!

I found this challenge to name 15 blogs quite hard, because I like every blog I follow (otherwise I wouldn't be following them) and if you have to make a small list of great blogs it's very hard to choose. I probably looked over dozens of blogs who are just as awesome as the ones mentioned here, so definitely also take a look at the other blogs I follow! :)

And now, 7 things about myself:

1. I'm a vegetarian. 
2. My favourite sort of animal are rodents. I can't get over how cute guinea pigs and mice are. And while some people might think rats are disgusting, I think they are really cute :)
I actually got to babysit my friend's hamster this weekend, it's the cutest little fuzzball ever!


3. The food that I can always eat, every day, morning and night, whether I'm hungry or not, whether I'm being attacked by a giant sixteen legged spider or not, is spaghetti! With pizza and lasagna on a tied second place.
4. I still use the same cell phone I got when I was 12 - my trustworthy Nokia is now about 9 years old.
5. I love watching old movies - Hitchcock's Psycho is one of my favourites.
6. Some of my favourite tv-shows are Battlestar Galactica, Doctor Who, Breaking Bad, The Walking Dead, Game of Thrones, Sherlock and Arrested Development (I'm probably forgetting dozens of others).
7. For my boyfriend's birthday I painted Sherlock themed shoes for him.

Okay, that's it! I hope you all enjoyed getting to know some random stuff about me!
Thanks for reading everyone :)


Monday 11 November 2013

Blue Shimmer Nails


I'm really in love with these nails, they look so nice and subtly sparkly, but at the same time they also look a bit though :)

For this manicure I used the saran wrap technique with Opi's Raw Granite DS Lapis (gorgeous blue!).
I thought that this manicure would look more like other saran wraps I've seen (if you google it you'll know what I mean by that): a lot of blue polish on top the black. 

As you can see, I didn't actually get a lot of blue polish. Instead, I got this gorgeous blue shimmer, and I'm suuuper pleased with it! 

I think that the saran wrap just didn't really pick up any of the blue polish and only got the glittery stuff, which resulted in this. I love the subtlety of this manicure - I've chosen pictures here that show off the blue very good, but in some lighting you can't really see the blue and get more of a silvery shine.

*EDIT: maybe I should specify how exactly I did the saran wrap, because I think it makes a difference in the effect you get. Some people put the second colour of polish onto their nails and then dab onto it with saran wrap, making the polish go off from the nail a bit. I, however, followed another method: I put some polish onto a piece of paper, dabbed the saran wrap in it and then dabbed the wrap onto my nails, creating this shimmer. So instead of making the polish come off like in the first technique, you just make the polish go onto your nails :) *


Now, as you might know, Opi's DS Lapis is a matte polish with glitters in it, and the bits of polish I actually did get on my nail were also matte. I didn't like this effect at all, since the black polish underneath it was shiny. So I put on a shiny topcoat, added a row of silver studs from BornPrettyStore, and this manicure was done!


I love how this manicure is very simple to make, but looks a bit different, sparkly and fun at the same time.
What do you think? :)

p.s.: I got nominated for the Versatile Blogger Award by The Nail Snail (hurrah!), so I'm going to make a post about that very soon! 

Thursday 7 November 2013

Moustaches Here, Moustaches There, OMG There's Moustaches Everywhere!


Okay, since this months is all about Movember, I decided to participate as well! No, I didn't grow a moustache, but I drew little staches on my nails!


I started by painting the little triangles on my nails using striping tape. Then I painted my nails in a base colour, and on the four nails with triangles I painted the contrasting colour on very carefully. 
After that, I decided to emphasize the triangles with white - it's freehanded, which you can see, but I have to learn to make good stripes without striping tape so all I can do is practice practice practice!

After this, the base design was ready. I then painted on little black moustaches, using a dotting tool and a fine brush. You can find a lot of tutorials on how to paint moustaches onto your nails, but I followed this one by Cutepolish. 

It wasn't actually all that hard to paint the moustaches, I was surprised at how good they look. I was even more surprised at how good they look on my non-dominant hand - I actually like this design on my non-dominant hand better, because I like the colour placement more, but also because some of the moustaches actually came out like a dream!


Then to finish this post: whenever I think about moustaches, I automatically think about all the fuss about Watson's moustache in the Sherlock S3 trailer - any of you watch that? :)

Thanks for reading!

Tuesday 5 November 2013

Pink and Blue Watermarble


Watermarble!

This is in no way a contender for “best watermarble in the universe” and I envy people who can make crazy awesome watermarble designs, but I have improved tremendously with this technique so I’m actually quite proud of this design! 

I'm glad I finally found some polishes I can marble with, the others I've tried just didn't spread out in circles like they're supposed to. But these worked perfectly!

Now that I've done an okay watermarble design and seen so many other pretty watermarbles, I think I'm going to be practicing this technique a lot in the coming months. I can only get better, right? :)

Unfortunately, my top coat smudged everything a bit, so the pink isn't as clean as it was before. Lesson learned: buy new top coat.

Thanks for reading!

Sunday 3 November 2013

Bloody Fingerprints


A late blogpost about my Halloween nails!
For Halloween, I was dressed as a pool of blood, so I thought these bloody fingerprint nails were quite appropriate :)


I made them by first painting my nails white, and then I put some red nail polish onto my finger. I wiped off the excess polish and pressed my finger onto my nail, creating these fingerprints. Really easy, and it looked very disturbing. In other words, great for Halloween :)

Monday 28 October 2013

Halloween Slime Drips


Hi everyone!
Today I got in the Halloween spirit and did some green slime drip nails, which glow in the dark!


I recently bought a neon green glow in the dark polish from BornPrettyStore, and that polish is just absolutely perfect for slime drips! It's a suuuuperbright neon and it's a perfect slime colour, haha. And it glows in the dark, which is a major plus. I couldn't stop staring at my nails at night! 
But jeez, how hard is it to take a decent glow in the dark picture! Anyhow, I managed to get two sort of alright shots :)

If anyone's interested, here's the link to the BornPrettyStore polish - I got #4.


Thanks for reading!

Saturday 26 October 2013

Review Sally Hansen Fuzzy Coat


Sally Hansen's Fuzzy Coat! I am really excited about this polish , it just looks so fun and different from any other polishes I own. It's a sheer polish with tiny black and white bits in, and surprisingly enough it has very good coverage.

About a week ago I saw this polish in the store, and I was really curious about the effect so I bought it. They had a few different colours, but since I didn't really know how the polish would look I opted for the safe choice with black and white. This is my first Sally Hansen polish by the way - up until now, I hadn't found a store nearby that sells them.

So, my opinion about this polish:
Simply put: I love it. It looks very different, I think at actually looks as if I put nail stickers on my nails, because the effect is so special. I only bought nr. 800, Tweedy, so I don't know if the other colours will look as nicely on your nails as this one. 


The application went alright, at first it was a bit of a struggle to find the right way to get good coverage with this polish, but once I got used to it, it went smoothly. The only thing is that you can't put too much polish on your nails in one time, since it doesn't dry so good then. On my one hand, I had 3 thick layers of the polish because I wanted good coverage, but it took ages for it to dry, and if I bumped into something with my hand the polish would shift a little or even peel off where the layers were too thick, so I had to correct this in the evening. 
On my other hand, however, I did 3 thin layers and had no problems whatsoever. And the coverage was also really good, so you actually don't need very thick layers with this polish - something which I was quite surprised about, but also very pleased with :)

The polish has a bit of a matte finish: if you would like it to be very shiny, you should put a topcoat on. I tried the polish both with a glossy topcoat and with an extra matte topcoat, as you can see here:


I looked up some reviews about this polish, and there were really only two opinions about this polish: you either love it, or you hate it. Most people who hated it complained about how hard it was to get the polish off (a lot harder than glitter polish, apparently), so that'll be an adventure for me this evening!

The one downside (apart from maybe the removal) is that the bits of black and white sort of stick up a bit from your nail sometimes, so the surface of your nail isn't that smooth. But honestly, this didn't bother me at all. The tip of my nails also weren't smooth, because the black and white bits sticked out there as well. At first this annoyed me so much - for me, my nails really have to be very smooth at the tips, otherwise I just go crazy - but I eventually got used to it, thankfully.

So, what do you think about this polish? Does anyone maybe own the other colours? :)
Thanks for reading!

Wednesday 23 October 2013

Dry Marble Nails

  
Today's nails: dry marble with orange and pink!


For this design, I used OPI Ate Berries In The Canaries and D'Orleac Mate 01.
Dry marble is a great technique for those of us who kind of suck at watermarble, but still want to have all those fun flowy lines in our design :)

How to:
First I painted my nails with a base coat, and then I painted them with the OPI colour.
After that, I put big blobs of the orange and pink colour on my nails (but then again, not too thick: you want the blobs to be thick enough to be able to sort of stir in them with a toothpick, but not so thick that you can see an amazingly thick coat of polish on your nails when you have made the design - it's a bit hard to explain, but I think that when you're trying this for yourself, you'll notice very quickly when there's too much or too little polish).
When the blobs were on my nails (one nail at a time!) I took a toothpick (a needle would also work) and stirred around a bit in the blobs, to make them mingle and to create flowy lines.
After that, I immediately put a top coat on to make the lines even flowier, and then I added a few silver studs from BornPrettyStore :)


I really like how these colours match and flow in each other, but I regret that the effect is not more visible. You have to look closely to see the different colours. The effect is most visible on my index finger and my thumb. I also had some trouble with bubbles in the design (you can see this quite clearly on my ring finger). If anyone has any tips or tricks on how to avoid this, always welcome!

Thanks for reading!